POTD: Umbilical Vein Catheterization

I wanted to review a fairly rare but lifesaving EM procedure in neonates. This procedure is done fairly commonly in the NICU/L&D, but is done less frequently in the ED, especially with our excellent nurses who can literally get the most impossible venous accesses. If you went to Airway day, you might recall Dr. Sokolovsky describing her harrowing tale of providing neonatal resuscitation at Burning Man and performing an umbilical vein catheterization with an 18-gauge IV. Super wild! So for anyone who might find themselves in a similar poop-inducing situation with no pediatric support or NICU available, this is for you!


Umbilical vein catheterization is indicated in a neonate within 14 days post-birth requiring IV resuscitation. The stump must be "fresh", so it is most ideal in the newly born neonate. Here is an excellent video overviewing the following steps. https://pedemmorsels.com/wp-content/uploads/2019/08/UVC....mp4

Here's what you'll need:

  • Sterile gloves (gown and drape less non urgent)

  • chlorhexidine

  • forceps

  • scalpel

  • umbilical line (5 French is standard, 3.5 French in very premature baby)

  • three-way stopcock

  • umbilical tape of 3-0 silk/nylon

  • NS flush

In peds, we have umbilical vein catheterization trays located on the top shelf in Bay 31 that includes all of the above except the catheter. While the umbilical line is the traditional teaching, you can use any tube that can fit into the vein - that means an 18 gauge IV, pediatric central line, feeding tube, etc


Prep the umbilical stump

  1. Flush the line and place

  2. Sterilize the entire umbilical stump, including the clamp at the end of the stump, and the abdomen

  3. Tie the umbilical tape (or a silk string) around the base of the stump loosely. This helps decreased blood flow for when the clamp is eventually removed. It can also be tightened to secure the line once placed

  4. Holding the clamp, make a transverse cut off the stump to remove the distal tip. Cut should be made directly below the clamp or 2 cm from the abdomen.

Identifying umbilical vein and prep for insertion

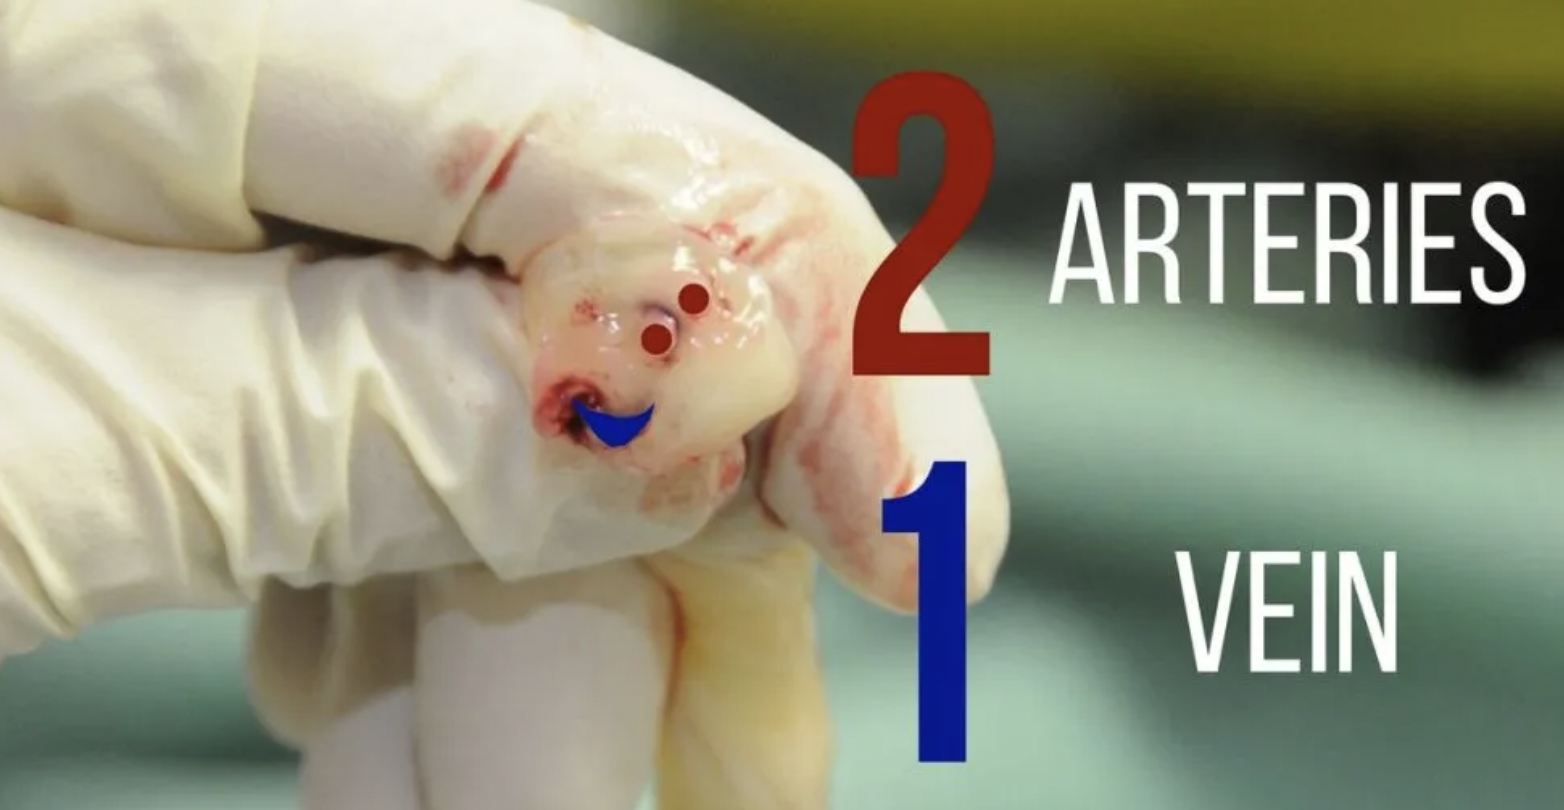
  1. Identify the umbilical vein. The anatomy of the stump involves two smaller umbilical arteries and one umbilical vein. The arteries are typically smaller and thicker lumen, while the vein is larger and more collapsible (see below)

  2. Remove any clots from the vein and gently dilate the vein with forceps

  3. gently insert the line, when you get blood return insert 1-2 cm deeper, or approx 3-5 cm. If there is resistance, consider loosing the umbilical string.

  4. Aspirate blood and flush with NS. Secure the line by tightening the umbilical string and securing with tape or purse string suture

Complications of UVC placement are similar to CVP placement: excessive bleeding, infection, thrombosis, arterial insertion. Specifically to UVC is risk of insertion too deep into the portal venous system or right atrium, which can lead to hepatic necrosis and perforation.

Resources:

https://first10em.com/umbilical-vein-catheterization/

https://wikem.org/wiki/Umbilical_vein_catheterization

https://www.ncbi.nlm.nih.gov/books/NBK549869/


POTD: Trigger Point Injections

Today, I wanted to write about the first bedside procedure I learned how to perform as an intern: the trigger point injection. I’ve heard that many residents have never done one of these, so I wanted to share that they have worked very well for me.

Musculoskeletal pain is a very common complaint in the ED and many of us have a special cocktail we refer to when treating it, usually involving a combination of topical analgesics, NSAIDs, and muscle relaxants. However, there is a time when these oral medications aren’t enough in the ED, or the patient has already failed outpatient management, and that is when the pain involves a trigger point.

A trigger point is a palpable area of muscle spasm that feels extra taut, which many of us commonly call a “knot.” While a patient will commonly complain of a broad region of pain, the pain is typically originating from the trigger point and the remainder is referred pain. Trigger points are significantly more tender than the surrounding region and pain is easily reproducible on palpation. There is no imaging to identify a trigger point (not even ultrasound); you have to feel it.

You can find everything you need easily: an alcohol swab, 1-2 mL local anesthetic (1-2% lidocaine without epinephrine, 0.25-0.5% bupivacaine, OR a 50-50 combination of the two), a 22 to 25 gauge needle, and a band-aid.

The procedure is fast and easy, and relief is nearly instantaneous when done correctly.

Steps:

1. Identify the trigger point and clean the area around it with the alcohol swab.

2. Insert the needle at a 30-degree angle, deep enough to penetrate the point (make sure your needle is long enough for deeper muscles!) When you hit the knot, you may elicit a “twitch” response, which is pathognomonic for a trigger point. Inject some anesthetic.

3. Pull out almost to the surface of the skin and redirect to deliver a small amount of anesthetic to each of the 4 quadrants of the trigger point. It is important to pull out almost all the way to avoid hematoma.

4. Apply a band-aid when complete.


Contraindications:

1. Overlying cellulitis

2. Nearby critical anatomical structure

3. Allergy to local anesthetic

4. Coagulopathy or bleeding disorder

5. Can’t feel a trigger point, or can't find a maximal point of tenderness – not a contraindication… but wouldn’t recommend, mainly because you and the patient are unlikely to be satisfied. And you’re more likely to become one of those people who say that trigger point injections don’t work!

Be well,

Maisa Siddique, PGY3

Sources

https://www.aliem.com/trigger-point-injection-musculoskeletal-pain/

https://www.acep.org/patient-care/map/map-trigger-point-injection-tool/


Chest Tubes and Their Complications

In honor of Trauma Tuesday, we’re going to talk about something that isn’t COVID related today!  Instead, we’ll talk about chest tubes and what to do when something goes wrong.


  • Indications

    • Pneumothorax

    • Hemothorax

    • Pleural Effusion

    • Malignant Effusion

    • Empyema/abscess

  • Procedure

    • Find your position

      • This should be in the “triangle of safety” which is bordered by the pectoralis major, lateral dorsalis, and 5th intercostal space

        • If you stay in this triangle of safety, you should avoid damaging other organs like the diaphragm, liver, or spleen, as well as the axillary vascular located above that triangle

      • Always go above the rib edge, not below

        • This is to avoid the neurovascular bundle that runs along the inferior edge of the rib

    • Prepare your space

      • This should be a sterile procedure whenever possible (sterility is less important if your doing a thoracotomy on a traumatic arrest patient)

      • Prep the area with chlorhexidine and lay out your sterile drape in a way that will allow access to the triangle of safety so that you aren’t breaking sterility while performing the procedure

    • Place the chest tube!

      • Use lots of local anesthetic and go all the way down to the rib, including the periosteum; this is a painful procedure and you don’t want them moving on you

      • Measure the chest tube from the incision site to the clavicle on the same side to estimate how deep you should place the chest tube

      • Clamp 1 end of the chest tube

      • Make an incision along the superior border of the 5th rib that is large enough for your finger and the tube

      • Use a Kelly clamp to dissect the soft tissue, opening it periodically as you go to make sure the space in the soft tissue is large enough for the procedure

      • Once you get to the rib, use your finger to guide the clamp over the superior aspect of the rib and into the pleural space.  Once in, spread the clamp to open up the hole you made in the pleura

      • Place your finger in the hole and sweep 360o to check for adhesions; be careful if there are any broken ribs, they are sharp and can cut you!

      • Clamp the other end of the chest tube with the Kelly clamp and use this to guide the tube into the pleural cavity along your finger which should still be in the hole you made

      • Advance the tube until all fenestrations are in the pleural cavity (you should have an idea of how deep to go by your measurement earlier on!) and direct the tube superoanteriorly for pneumothorax or posteriorly for a fluid collection

      • Hook up the chest tube to the pleurovac and secure everything in place

  • So now we know when to place a chest tube and how to do it, but what do we do when something goes wrong?

    • Malposition

      • A common problem associated with chest tube placement

      • Can be the result of the direction the tube was placed in or the result of the tube being in the wrong place entirely (ie in the subcutaneous tissue, within the lung itself, or buried in a fissure of the lung)

      • Xray can help you determine where the chest tube is located and whether it is malpositioned

      • If it is malpositioned:

        • You can’t pull back and readjust the chest tube, as it is no longer sterile

        • If the chest tube is still draining something, then it is reasonable to discuss with the admitting team whether the tube should be replaced entirely or if it should be left in place for the time-being

        • If it is not draining, it should be removed entirely and a new chest tube should be inserted using sterile techniques

    • Obstruction

      • A tube can be occluded by blood clots or particularly thick, viscous fluid

      • You can assess for an obstruction by looking at the water-seal in the pleuro-vac when it is set to gravity

        • Under normal circumstances, the water-seal in the chamber should vary with respiration or coughing

        • If you aren’t seeing variation with respiration or coughing, the tube may be occluded or the lung may be completely re-expanded

      • Occlusions typically resolve spontaneously without further intervention

        • You should not strip or “milk” the chest tube, as there is no evidence demonstrating that this will resolve an obstruction and can cause harm by creating increases in negative pressure within the thoracic cavity

        • If the obstruction is not resolving spontaneously, you may need to replace the chest tube

    • Air leak

      • An air leak can be normal when you first insert the chest tube or while attempting to resolve a pneumothorax

      • A new or persistent air leak is concerning and suggests there may be a problem with the circuit preventing the chest tube from functioning correctly

      • An air leak can occur due to bronchopulmoary injury or fistula, entry of air from the insertion site, or having some of the holes at the end of the chest tube outside of the body

      • To identify an air leak, check the water-seal for constant bubbling

        • If you suspect air may be entering from the insertion site, you should attempt to further close or bandage the site to stop the leak and create a closed system

        • If the holes on the chest tube are not fully within the body, the chest tube will need to removed and replaced; again you cannot insert the chest tube further once the procedure is complete, as it will no longer be sterile

    • Subcutaneous emphysema

      • This can occur if the tube is completely or partially in the subcutaneous tissue rather than the pleural cavity

      • This can be identified by feeling for crepitus and checking an xray

      • If subcutaneous emphysema is present but the tube is correctly positioned within the pleural cavity, the emphysema will resolve spontaneously and no further action is necessary

      • If the tube is incorrectly positioned, it should be removed and replaced

    • Lung injury

      • The lung parenchyma can be injured during chest tube placement, typically resulting in a pulmonary laceration

      • These injuries can result in bronchopleural fistula formation

      • Such injuries may be identified by the presence of persistent bleeding or on xray

        • Check for tube placement on xray to ensure it is not in the lung itself, as well as for an effusion that may appear as a result of a pulmonary laceration

      • If you suspect lung injury and the patient is stable, CT chest can also help determine the exact location of the chest tube

      • If you are concerned there may be lung injury, consult cardiothoracic surgery immediately

    • Re-expansion pulmonary edema

      • This is the formation of pulmonary edema as a result of rapid re-expansion of the lung after the resolution of a large pneumothorax, hemothorax, or pleural effusion

      • Likely a result of an inflammatory response following the rapid change

      • To best try and avoid this, avoid removing more than 1L of fluid at one time

        • After removing 1L of fluid, the tube should be left in place but clamped to avoid further drainage