First, how does guaiac testing work and why was it developed?
A small amount of heme present in the stool reacts with hydrogen peroxide to oxidize the paper
In other words, a small amount of blood in the stool causes the paper to turn blue
It was developed to allow physicians to detect small amounts of blood that could signify an otherwise asymptomatic malignancy, allowing for further testing and earlier detection
Why do we use it in the ED?
To determine whether there is blood in the patient’s stool
We then utilize this information to determine whether there may be a GI bleed
What are the problems with guaiac testing?
The sensitivity of a guaiac test is very poor, even for its intended purpose of screening for malignancy
As a result, the correct specimen collection protocol is to have the patient take home multiple cards and collect samples from 6 different BMs
Immunochemical assays are now preferred for malignancy screening due to its increased sensitivity, allowing an accurate test with only 1 sample
The sensitivity and specificity of the test decrease with sample collected by digit rectal exam rather than those collected from normally passed stool
There are many sources of false positives, including but not limited to:
Epistaxis
Digested foods such as meat products containing nonhuman heme and certain vegetables including broccoli
Subjective nature of the test itself (what looks blue and positive to one practitioner may be read as negative by another)
There is minimal data evaluating the use guaiac testing in the emergency department, as this is not its intended purpose
1 study looked at guaiac tests in patients with known upper GI lesions and found that the test was positive in only 11 of 42 patients
Given this lack of compelling data, the majority of gastroenterologists do not recommend guaiac testing in the emergency department, and do not rely on guaiac results from the ED to alter management
In summary…
The guaiac test was developed to detect small amounts of blood in the stool in order to screen for malignancy, not for use in the ED
The test has poor sensitivity, particularly when utilized after a digital rectal exam, meaning that many patients with a GI bleed may have a falsely negative guaiac result
There are many reasons a patient may have a false positive, even his diet the night before
So go out and do your digital rectal exams to document the color of the stool (is there melena, is there bright red blood), but perhaps you shouldn’t rely on the guaiac to help determine clinical management
- Medications
- Pharmacology
- Respiratory / Pulm
- POCUS
- Infectious Disease
- Ophthalmology
- Airway
- Obstetrics / Gynecology
- Environmental
- Procedures
- Foreign Body
- Pediatrics
- Cardiovascular
- EKG
- Critical Care
- Radiology
- Emergency
- Admin
- Orthopedics
- Nerve Blocks
- DVT
- Finance
- EMS
- Benzodiazepines
- Neurology
- Medical Legal
- Psychiatry
- Anal Fissure
- Hemorroids
- Bupivacaine
- Ropivacaine
- EM
- Neck Trauma
- Emergency Medicine
- Maisonneuve Fracture
- Diverticulitis
- Corneal Foreign Body
- Gabapentin
- Lethal Analgesic Dyad
- Opioids
- Galea Laceration
- Dialysis Catheter
- Second Victim Syndrome
- Nasal Septal Hematoma
- Nephrology / Renal
- Hematology / Oncology
- Dental / ENT
- Dermatology
- Endocrine
- Gastroenterology
- April 2025
- March 2025
- February 2025
- January 2025
- December 2024
- November 2024
- October 2024
- September 2024
- July 2024
- June 2024
- May 2024
- April 2024
- March 2024
- February 2024
- January 2024
- December 2023
- November 2023
- October 2023
- May 2023
- February 2023
- January 2023
- December 2022
- November 2022
- October 2022
- September 2022
- August 2022
- July 2022
- June 2022
- May 2022
- April 2022
- March 2022
- February 2022
- January 2022
- December 2021
- November 2021
- October 2021
- September 2021
- August 2021
- July 2021
- June 2021
- May 2021
- April 2021
- March 2021
- February 2021
- January 2021
- December 2020
- November 2020
- October 2020
- September 2020
- August 2020
- July 2020
- June 2020
- May 2020
- March 2020
- February 2020
- January 2020
- December 2019
- November 2019
- October 2019
- September 2019
- August 2019
- July 2019
- June 2019
- May 2019
- April 2019
- March 2019
- February 2019
- January 2019
- December 2018
- November 2018
- October 2018
- September 2018
- August 2018
- July 2018
- June 2018
- May 2018
- April 2018
- March 2018
- February 2018
- January 2018
- December 2017
- November 2017
- October 2017
- September 2017
- August 2017
- July 2017
Chest Tubes and Their Complications
In honor of Trauma Tuesday, we’re going to talk about something that isn’t COVID related today! Instead, we’ll talk about chest tubes and what to do when something goes wrong.
Indications
Pneumothorax
Hemothorax
Pleural Effusion
Malignant Effusion
Empyema/abscess
Procedure
Find your position
This should be in the “triangle of safety” which is bordered by the pectoralis major, lateral dorsalis, and 5th intercostal space
If you stay in this triangle of safety, you should avoid damaging other organs like the diaphragm, liver, or spleen, as well as the axillary vascular located above that triangle
Always go above the rib edge, not below
This is to avoid the neurovascular bundle that runs along the inferior edge of the rib
Prepare your space
This should be a sterile procedure whenever possible (sterility is less important if your doing a thoracotomy on a traumatic arrest patient)
Prep the area with chlorhexidine and lay out your sterile drape in a way that will allow access to the triangle of safety so that you aren’t breaking sterility while performing the procedure
Place the chest tube!
Use lots of local anesthetic and go all the way down to the rib, including the periosteum; this is a painful procedure and you don’t want them moving on you
Measure the chest tube from the incision site to the clavicle on the same side to estimate how deep you should place the chest tube
Clamp 1 end of the chest tube
Make an incision along the superior border of the 5th rib that is large enough for your finger and the tube
Use a Kelly clamp to dissect the soft tissue, opening it periodically as you go to make sure the space in the soft tissue is large enough for the procedure
Once you get to the rib, use your finger to guide the clamp over the superior aspect of the rib and into the pleural space. Once in, spread the clamp to open up the hole you made in the pleura
Place your finger in the hole and sweep 360o to check for adhesions; be careful if there are any broken ribs, they are sharp and can cut you!
Clamp the other end of the chest tube with the Kelly clamp and use this to guide the tube into the pleural cavity along your finger which should still be in the hole you made
Advance the tube until all fenestrations are in the pleural cavity (you should have an idea of how deep to go by your measurement earlier on!) and direct the tube superoanteriorly for pneumothorax or posteriorly for a fluid collection
Hook up the chest tube to the pleurovac and secure everything in place
So now we know when to place a chest tube and how to do it, but what do we do when something goes wrong?
Malposition
A common problem associated with chest tube placement
Can be the result of the direction the tube was placed in or the result of the tube being in the wrong place entirely (ie in the subcutaneous tissue, within the lung itself, or buried in a fissure of the lung)
Xray can help you determine where the chest tube is located and whether it is malpositioned
If it is malpositioned:
You can’t pull back and readjust the chest tube, as it is no longer sterile
If the chest tube is still draining something, then it is reasonable to discuss with the admitting team whether the tube should be replaced entirely or if it should be left in place for the time-being
If it is not draining, it should be removed entirely and a new chest tube should be inserted using sterile techniques
Obstruction
A tube can be occluded by blood clots or particularly thick, viscous fluid
You can assess for an obstruction by looking at the water-seal in the pleuro-vac when it is set to gravity
Under normal circumstances, the water-seal in the chamber should vary with respiration or coughing
If you aren’t seeing variation with respiration or coughing, the tube may be occluded or the lung may be completely re-expanded
Occlusions typically resolve spontaneously without further intervention
You should not strip or “milk” the chest tube, as there is no evidence demonstrating that this will resolve an obstruction and can cause harm by creating increases in negative pressure within the thoracic cavity
If the obstruction is not resolving spontaneously, you may need to replace the chest tube
Air leak
An air leak can be normal when you first insert the chest tube or while attempting to resolve a pneumothorax
A new or persistent air leak is concerning and suggests there may be a problem with the circuit preventing the chest tube from functioning correctly
An air leak can occur due to bronchopulmoary injury or fistula, entry of air from the insertion site, or having some of the holes at the end of the chest tube outside of the body
To identify an air leak, check the water-seal for constant bubbling
If you suspect air may be entering from the insertion site, you should attempt to further close or bandage the site to stop the leak and create a closed system
If the holes on the chest tube are not fully within the body, the chest tube will need to removed and replaced; again you cannot insert the chest tube further once the procedure is complete, as it will no longer be sterile
Subcutaneous emphysema
This can occur if the tube is completely or partially in the subcutaneous tissue rather than the pleural cavity
This can be identified by feeling for crepitus and checking an xray
If subcutaneous emphysema is present but the tube is correctly positioned within the pleural cavity, the emphysema will resolve spontaneously and no further action is necessary
If the tube is incorrectly positioned, it should be removed and replaced
Lung injury
The lung parenchyma can be injured during chest tube placement, typically resulting in a pulmonary laceration
These injuries can result in bronchopleural fistula formation
Such injuries may be identified by the presence of persistent bleeding or on xray
Check for tube placement on xray to ensure it is not in the lung itself, as well as for an effusion that may appear as a result of a pulmonary laceration
If you suspect lung injury and the patient is stable, CT chest can also help determine the exact location of the chest tube
If you are concerned there may be lung injury, consult cardiothoracic surgery immediately
Re-expansion pulmonary edema
This is the formation of pulmonary edema as a result of rapid re-expansion of the lung after the resolution of a large pneumothorax, hemothorax, or pleural effusion
Likely a result of an inflammatory response following the rapid change
To best try and avoid this, avoid removing more than 1L of fluid at one time
After removing 1L of fluid, the tube should be left in place but clamped to avoid further drainage
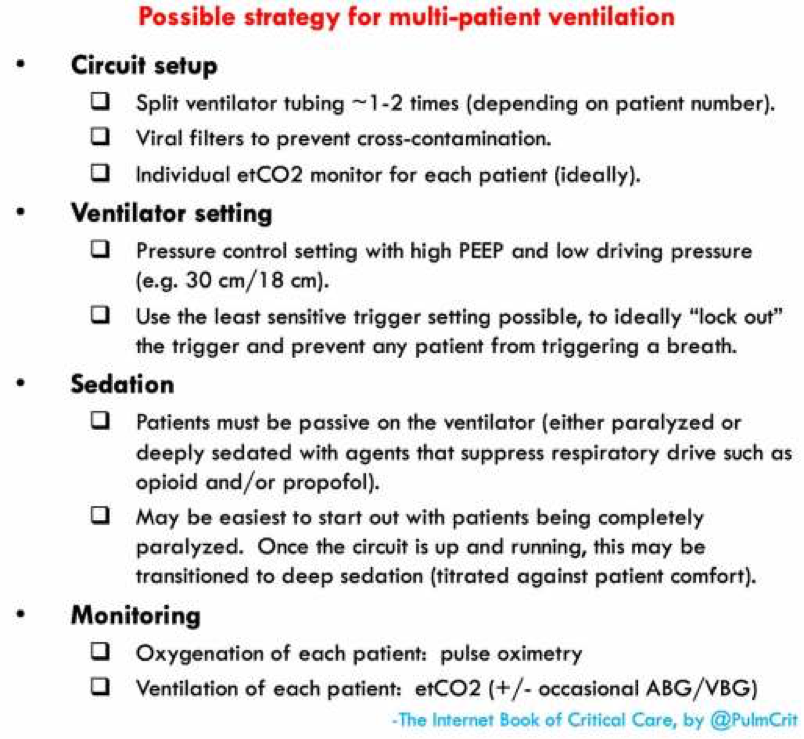
How to Hook up Multiple Patients to the Same Vent
Today, we’re going to talk about hooking up multiple intubated patients to the same ventilator. As the coronavirus becomes increasingly more prevalent and more patients require intubation, knowing how to do this may become more important than ever before.
Why would I do this?
As more and more patients require intubation, ventilators are going to become a precious resource. We want to maximize our resources to help as many people as possible.
So what are the downsides?
You can no longer adjust the vent to optimize it for a single patient
Under normal circumstances, you want to optimize vent settings for a specific patient
This allows you to maximize oxygenation and ventilation while also keeping the patient as comfortable as possible on the ventilator in order to avoid having to over-sedate the patient
You can no longer allow a patient to trigger the vent
Under normal circumstances, vents allow a patient to trigger a breath
This is helpful because it is more comfortable for the patient and will allow an intubated patient to be less sedated
However, you don’t want one patient triggering breaths on the vent and thereby affecting every other patient
For example, if one patient is tachypneic and triggering breaths, all other patients attached to the same vent will be forced to breathe at this rate as well
Ventilation is less effective
In order to attach multiple patients to a single vent, you will need to use a large amount of tubing with Y-site connectors
This results in increased dead space making tidal volumes less accurate
As a result, patients are more likely to develop hypercapnia in this setup
This will likely require permissive hypercapnia in these patients
Now that we understand the downsides to this setup, let’s discuss the settings you will need to consider
You will want to use pressure control for these patients
Why not volume control?
Normally, volume control is helpful because it allows you to provide a specific tidal volume to a patient, but is limited because it allows no control over peak pressure
When you have multiple patients attached to a single vent, however, you are no longer able to accurately control the tidal volume of any single patient
If there is a problem with one patient, for example if there is an obstruction or kinking of the ET tube, than the other patient on the vent will get significantly increased tidal volume as the volume intended for 2 patients enters only 1. This can result in dangerously high peak pressures and barotrauma.
If you want to hook up multiple patients to the same vent with volume control, they would all need to receive the same volume, meaning they should all be a similar size. This further restricts which patients may be placed on the same vent.
Why is pressure control better?
Even with multiple patients hooked up to the same vent, you can maintain adequate control over the peak pressures supplied.
If there is a problem with one patient, for example there is an obstruction or kinking of one ET tube, it will not affect the other patient. The patient with the problematic ET tube will receive less tidal volume, but the other patient on the vent will be unaffected.
Different sized patients can be hooked up to the same vent, since larger patients have higher compliance and therefore will receive larger breaths
You should set the vent to continuous mandatory ventilation
You do not want patients to trigger the vent and thereby affect other patients attached
Instead, you need continuous mandatory ventilation, in which the vent is set to a fixed rate and the patient cannot trigger the vent
If the vent does not have this mode as an option, you can instead max out the ventilator trigger threshold, thereby preventing patients from triggering the vent
If this doesn’t work or the patient is fighting the vent, then you may need to consider sedation that also suppresses the respiratory drive such as opiates and propofol
If even that is unsuccessful and the patient is still fighting or triggering the vent, you may need to consider paralytics
Ok, now we understand the pros and cons, as well as the settings we need. How do we set this up?
First, make sure the patients you are attaching to a single ventilator have similar vent requirements; ie don’t attach a patient who needs an FiO2 of 30% and PEEP of 5 to the same machine as a patient who needs an FiO2 of 100% and PEEP of 15
Set up the vent settings as discussed above
Attach viral filters to prevent cross-contamination between patients
Using Y-site connectors, attach the expiratory and inspiratory limbs of the vent to all ET tubes as shown in the diagram
Keep in mind, that this setup has been tested primarily with lung models and animals; there isn’t significant data from human studies. But it may be important despite this going forward!
Pics courtesy of emcrit.org
Stay safe everyone!