VOTW: “D”-oh! What a heart!

Hello all! This week’s VOTW is brought to you by myself.

Hospital course

30 y/o M presents to the ED after 2 syncopal episodes. He had 10 days of worsening dyspnea on exertion with chest pressure and palpitations. He flew to California 1 month ago and returned yesterday.  

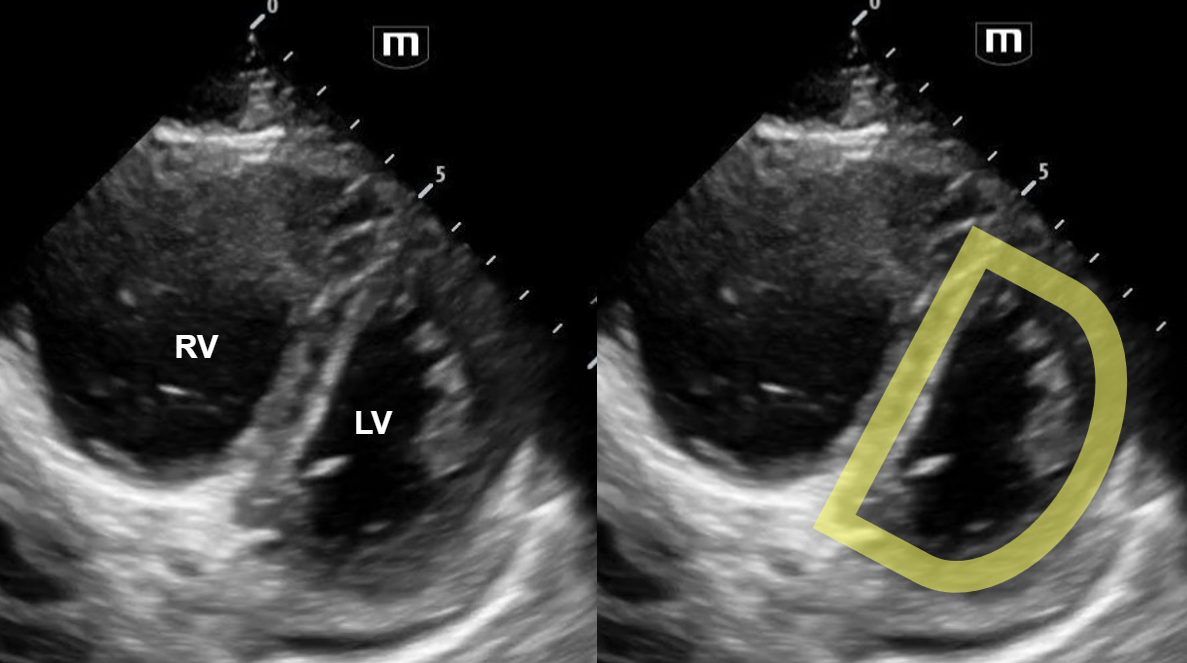
In the parasternal short view of the heart above, we see two cardiac chambers, the right ventricle (RV) and the left ventricle (LV). We can see flattening of the interventricular septum towards the LV chamber, creating a “D”-shaped LV (labelled above).

View the attached clip to see the LV take on a shape of the letter “D” with each contraction! Also note that the RV is dilated and appears larger in size than the ”D”-shaped LV.

The clip above shows a parasternal short view of a normal heart. Notice that the left ventricle appears circular, and the right ventricle forms a smaller crescent-shape surrounding the left ventricle.

Case Conclusion

CT imaging showed pulmonary emboli within the bilateral pulmonary arteries and dilatation of the right atrium and right ventricle associated with right heart strain.

Thrombectomy was deferred because patient was hemodynamically stable. He was started on a heparin infusion in the ED and then admitted.   

Right heart strain

·       Pulmonary embolism can cause an acute increase in pulmonary pressures and right ventricular afterload that causes increased right heart strain. Focused ultrasound has been shown to be both highly sensitive and highly specific in detecting anatomical changes of the heart seen with right heart strain.

·       “D-sign” is a finding suggestive of right heart strain seen on the parasternal view of the heart. Increased right ventricular pressures cause bowing of the interventricular septum into the LV, causing the “D”-shaped LV to form.

·       Other findings suggestive of right heart strain include increased RV size, McConnell’s sign, and TAPSE.


Happy scanning!

Sono team

PS: just in case nobody gets it, the subject line pun is a Simpsons reference!


Resources to review:

·       https://www.thepocusatlas.com/right-ventricular-dysfunction/

·       https://everydayultrasound.com/blog/category/Right+Ventricular+Strain

·       https://www.acep.org/sonoguide/basic/cardiac

 · 

POTD: Those Hips Don't Lie

To kick off the block I’ll be talking about hip dislocations as today is ~Trauma Tuesday~ after all. I have only attempted to reduce one hip myself and it was while I was at Midwood Community hospital a few weeks ago. Dr. Duo Xu and I were pushing and pulling with all our might but despite all our best efforts, ultimately it was unsuccessful and the patient was transferred to MMC main for orthopedics. Honestly, we were not surprised as the patient had dislocated it the prior day and also had a hip replacement. This inspired me to want to delve into this topic some more, especially on reduction techniques. 

Classifications

Posterior: Most common, 90% of hip dislocations

  • Occurs when an axial load is applied on a Flexed and ADDducted hip

  • ie motor vehicle crashes where patient's knee hits the dashboard

Anterior: 10% of hip dislocations

  • Occurs when an axial load is applied on a Extended and ABducted hip 

As with other dislocations, you always want to be mindful of injury to the nearby vessels and nerves. Depending on the mechanism of injury, there may be an underlying fracture. If there is an associated fracture, this becomes a complex dislocation.

Management for simple closed isolated hip dislocation

  • Obtain xray films, pain medication 

  • Reduce ideally under 6 hours to reduce chances of developing avascular necrosis. One study found that after 6hrs, 53% of patients developed avascular necrosis 

  • Procedural sedation 

Management for complex closed isolated hip dislocation 

If there is an associated femoral fracture then you’ll need to get orthopedics on board. They may take the patient to the OR and have everything taken care of intra-operatively. 

Reduction techniques

There are dozens of methods and various combinations/modifications but I'm going over a few that I think are more intuitive and less likely to injure myself.

Rocket Launcher

Patient supine in stretcher almost with both legs hanging off stretcher 

You flex their knee and facing their feet, put your shoulder underneath the posterior fossa/calf with hands around lower tibia/ankle 

Use your shoulder to press upwards while hands pull down

Captain Morgan 

Patient supine in stretcher 

You have one leg flexed on stretcher and other leg flat on ground with patient’s calf on your thigh 

Push down by patient’s ankle, can also plantarflex your foot that’s on the stretcher to get more leverage

For short kings and queens a step stool may be helpful, I could barely get my foot comfortably up on the stretcher without feeling like I was about to dislocate my own hip 

Allis 

Patient supine in stretcher 

You put your hands around ipsilateral tibia, standing on stretcher can get you better leverage 

Pull upwards, remember that consistent traction is key

Some personal takeaways 

  • Don’t forget you need a nurse to record vitals / draw meds during the procedural sedation and during that time you are utilizing a lot of resources. 

  • You need at least one assistant to help keep the pelvis in place while you are reducing for all these maneuvers shown above

  • Maximizing pain relief and relaxation will increase your chances of success, your patient should be loosey goosey. Consider a regional nerve block (femoral, fascia iliaca)

  • Dislocated hardware joints are extremely difficult to reduce, once I had three orthopedic residents yanking on a dislocated hip while the EM attending and I helped pull traction

  • You may wake up sore the next day 

References: 

  1. https://www.orthobullets.com/trauma/1035/hip-dislocation 

  2. https://coreem.net/core/hip-dislocation/ 

  3. https://www.merckmanuals.com/professional/injuries-poisoning/how-to-reduce-dislocations-and-subluxations/how-to-reduce-a-posterior-hip-dislocation#Equipment_v45399602

  4. https://www.annemergmed.com/article/S0196-0644(22)00050-6/fulltext 

 · 

VOTW: Let’s put a knee-dle in that knee!

Hello all! This week’s VOTW is brought to you by myself.

Hospital course

50 y/o F presents to the ED with several weeks of lower back and left knee pain. Left knee is swollen and tender with palpation. She limps when ambulating due to the pain. Bedside ultrasound of the knee joint is shown below.

In the image above, the probe is placed over the suprapatellar space with a long-axis view. The femur is seen below, with a layer of dark anechoic effusion visible between the quadriceps tendon and the prefemoral fat pad.

Once the suprapatellar effusion was identified, the probe was rotated 90° into a transverse view of the knee, and the needle was inserted lateral to medial using an in-place approach. In the image above you can see the needle tip enter the effusion underneath the quadriceps tendon. The needle is the hyperechoic straight line in the left image, which is labelled with a white arrow in the right image.

In the clip above we can see this ultrasound-guided in-plane needle insertion with the needle tip entering the suprapatellar effusion.

In this clip, we can see the effusion shrink in size as the synovial fluid is actively aspirated through the needle!

Case Conclusion

The synovial fluid specimen was sent to the lab, and septic arthritis was ruled out. The patient’s left knee pain significantly improved after the arthrocentesis and she was discharged.

Ultrasound-guided knee arthrocentesis

·       While this procedure can be performed blind, the use of ultrasound improves accuracy, improves pain scores, and allows aspiration of more synovial fluid.

·       The patient should be positioned supine with the knee in 15-20° of flexion.

·       Begin by identifying a suprapatellar effusion by placing the linear probe superior to the patella with the marker oriented cephalad (long axis view of the knee). A joint effusion will look like an anechoic stripe within the joint space deep to the quadriceps tendon.

·       Once you identify a drainable effusion, rotate the probe 90° to obtain a transverse view (short axis view of the knee). A lateral to medial in-plane technique should be used to guide the needle tip into the joint effusion.

·       Remember to use a sterile ultrasound probe cover!

·       Ultrasound-guided arthrocentesis can be used to drain effusions from any joint, with commonly aspirated joints including knees, hips, shoulders, wrists, elbows, and ankles.

Happy scanning!

Sono team

Resources to review:

·       https://www.acep.org/sonoguide/procedures/arthrocentesis

·       https://mskultrasound.net/arthrocentesis-of-the-knee/

·       https://coreultrasound.com/knee-aspiration-and-injection/

 ·