Intranasal Analgesia and Anxiolysis

Today we will be discussing IN anxiolysis and analgesia, especially useful in our pediatric population.  An appendix with a BAN administration outline is also attached. Indications

Perfect for kids coming in with acute trauma (laceration, need for x-rays, etc) or patients undergoing procedures such as I&D of an abscess.

May be used prior to obtaining x-rays for pain control in children not necessarily needing a line for reduction (or even in those needing a line as this may be a faster way to reduce pain, and may help provider in obtaining IV line).


Routine Medications – Analgesia/Anxiolysis Dose

  • Analgesia: Fentanyl (1-1.5mcg/kg), Ketamine (0.5mg/kg)

  • Anxiolysis: Midazolam (0.2mg/kg)


Other IN Medications: Midazolam, Precedex (dexmedotomidine), flumazenil, naloxone


Pearls of Administration

Have patients blow their nose first if possible.

Try to limit dose to 0.3mL per nostril (certainly no more than 1 mL per nostril), using concentrated solutions. 

Divide larger volumes over two nostrils.

May deliver in aliquots 10-15 minutes apart if larger.

Remember, it’s a good idea to put patients on a pulse ox prior to administration.

Account for “dead space” of atomizer (~1mL).  

APPENDIX

BAN Dosing

Remember, there is also the BAN (breath actuated nebulizer) for medication administration which is a an alternative to intranasal medications when tolerated.  Only use BAN in Breath Actuated Mode in ED.

Here is the dosing for BAN:

  • Fentanyl:

    • Adults: 4mcg/kg dose titrated q 10 min up to three doses

    • Pediatrics: 2-4 mcg/kg titrated q 10 min up to three doses

  • Morphine:

    • Adults: 10-20 mg titrate q 10-15 min up to three doses

    • Pediatrics: 0.2 mg/kg q15 min up to three doses

 · 

Pulmonary Contusion

History:

  • Symptoms include SOB and chest pain.

    • Remember this may manifest as back pain depending on mechanism.

    • Look for in high impact injuries to chest (MVC, fall, pedestrian struck, trampled by livestock, etc)

    • MOA being compression-decompression.

Exam:

  • Flail chest or crackles (however unlikely unable to auscultate in ED).

  • Observe for crepitus for possible pneumothorax.

  • Seatbelt sign.

Diagnosis:

  • CXR or CT chest

  • Extent of injury not apparent on CXR for 24-48 hours

  • Areas of lung opacification within 6 hours diagnostic of pulmonary contusion.

  • There are NEXUS chest guidelines (yes, chest!) for patients>14 to omit any imaging in chest trauma (see appendix below) - 98.8% sensitive.

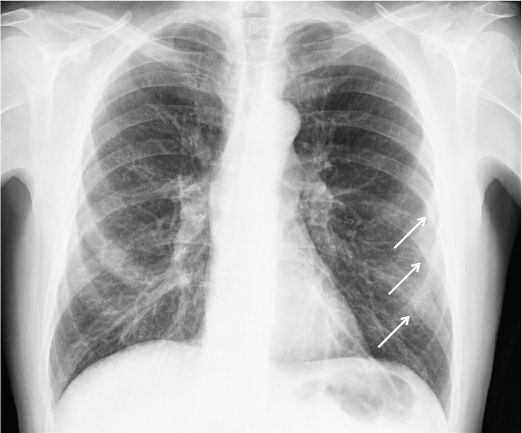
  • Look for homogenous focal or diffuse opacity that may cross typical anatomical landmarks (i.e. lobes).

pulm-contusion.jpeg

Treatment:

  • Primarily supportive. Watch for delayed presentation!

  • Consider Bipap; pain control with intercostal block or epidural inpatient. Avoid unnecessary fluids.

  • Up to 40-60% will require mechanical ventilation. Also may be necessary to sedate for pain control.

  • Place good lung in dependent position to improve V/Q mismatch 50% go on to develop ARDS (blood in alveoli activates inflammatory cascade).

  • If not improving - ECMO (V-V) is a possibility.

Bottom line:

  • Monitor patients suspicious for pulmonary contusion - if they have signs of CXR there is a good chance they may need more invasive support (e.g. intubation).

  • Have low suspicion for concurrent injuries including mediastinal and vascular injuries, diaphragmatic rupture, and cardiac contusion.

  • Be aware of patient fluid status and try not to overload patient.

Table-3_-NEXUS-Chest-Decision-Instrument.jpg

Keywords:  Pulmonary Contusion NEXUS Chest Radiography Chest Trauma

 · 

Fragile Skin Tears

Today we are going to try to focus on a practical skill which is increasingly important with our aging population: Fragile Skin Tears. Hemostasis/Pain Control:

  • Pressure

  • Use LET (Lidocaine-Epinephrine-Tetracaine)!

  • Topical TXA

  • Surgicel

Suture Techniques:

lac1.jpg
img2.jpg
  1. Apply a couple deep sutures to appose the wound edges. Then place steri strips across the wound and suture through them with 4.0 nylon sutures. This places tension on the tissue below rather than just on the skin.

  2. Place steri-strips parallel to the wound and suture through the steri strips with 4.0 nylon suture. Similar to approach above, however you are able to visualize the wound edges.

  3. Derma-Bond AND Steri Strips. Perform the above techniques, however derma-bond the edges of the wound, let dry, and place sutures through both the steri strips and derma bond. This will be the effective technique for preventing shearing of extremely fragile skin.

img4.jpg

Note there are many variations to this, you may also throw sutures behind the glue. Glue alone may work better for jagged edges than steri-strips. 

  1. Mattress sutures, tegaderm and wait etc.

Aftercare

When the steri strip techniques are used, try to keep wound dry (rather than using topical antibiotics such as bacitracin which will cause the steri strips to become ineffective.  Patients should be vigilant for signs of infection.

Sources:

EMDocs

Lacerationrepair.com

Aliem

Search Terms: Elderly Skin Parchment Laceration Fragile Skin Laceration Tear

 ·