POTD: Those Hips Don't Lie

To kick off the block I’ll be talking about hip dislocations as today is ~Trauma Tuesday~ after all. I have only attempted to reduce one hip myself and it was while I was at Midwood Community hospital a few weeks ago. Dr. Duo Xu and I were pushing and pulling with all our might but despite all our best efforts, ultimately it was unsuccessful and the patient was transferred to MMC main for orthopedics. Honestly, we were not surprised as the patient had dislocated it the prior day and also had a hip replacement. This inspired me to want to delve into this topic some more, especially on reduction techniques. 
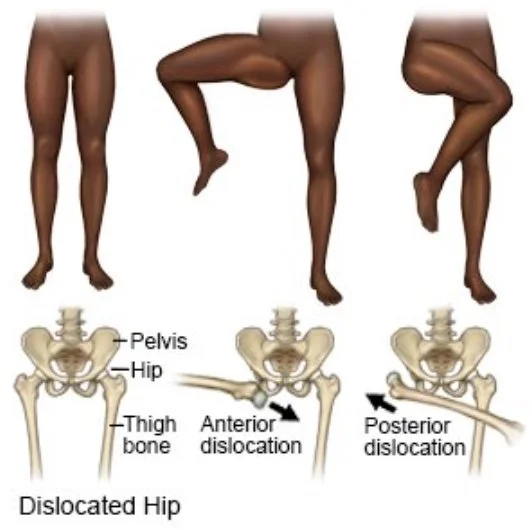
Classifications

Posterior: Most common, 90% of hip dislocations

  • Occurs when an axial load is applied on a Flexed and ADDducted hip

  • ie motor vehicle crashes where patient's knee hits the dashboard

Anterior: 10% of hip dislocations

  • Occurs when an axial load is applied on a Extended and ABducted hip 

As with other dislocations, you always want to be mindful of injury to the nearby vessels and nerves. Depending on the mechanism of injury, there may be an underlying fracture. If there is an associated fracture, this becomes a complex dislocation.

Management for simple closed isolated hip dislocation

  • Obtain xray films, pain medication 

  • Reduce ideally under 6 hours to reduce chances of developing avascular necrosis. One study found that after 6hrs, 53% of patients developed avascular necrosis 

  • Procedural sedation 

Management for complex closed isolated hip dislocation 

If there is an associated femoral fracture then you’ll need to get orthopedics on board. They may take the patient to the OR and have everything taken care of intra-operatively. 

Reduction techniques

There are dozens of methods and various combinations/modifications but I'm going over a few that I think are more intuitive and less likely to injure myself.
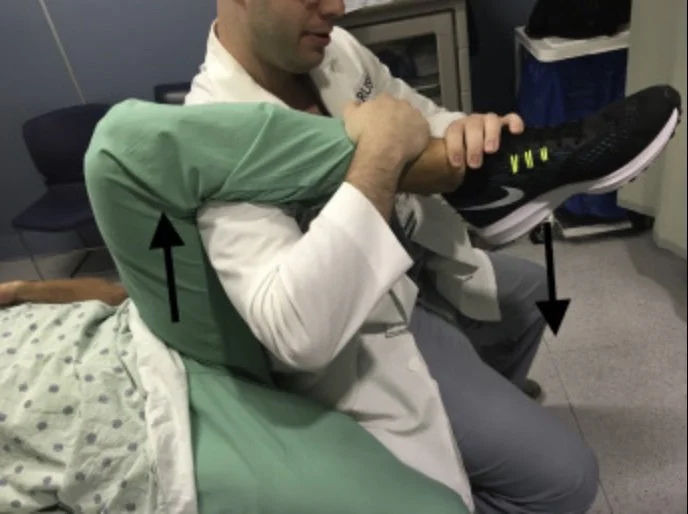
Rocket Launcher

Patient supine in stretcher almost with both legs hanging off stretcher 

You flex their knee and facing their feet, put your shoulder underneath the posterior fossa/calf with hands around lower tibia/ankle 

Use your shoulder to press upwards while hands pull down
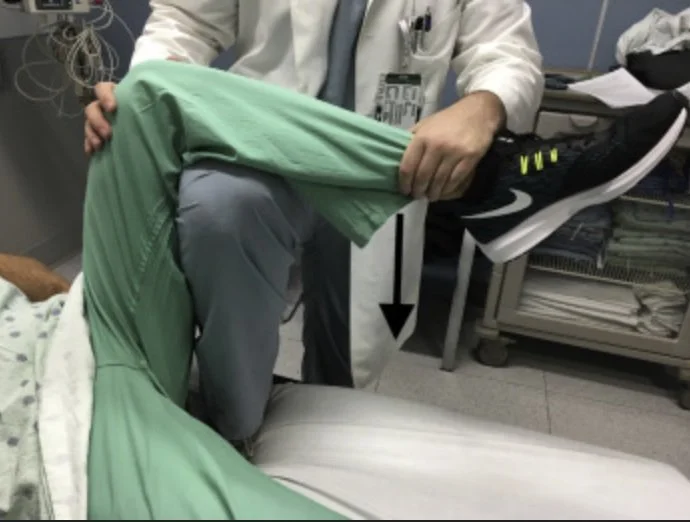
Captain Morgan 

Patient supine in stretcher 

You have one leg flexed on stretcher and other leg flat on ground with patient’s calf on your thigh 

Push down by patient’s ankle, can also plantarflex your foot that’s on the stretcher to get more leverage

For short kings and queens a step stool may be helpful, I could barely get my foot comfortably up on the stretcher without feeling like I was about to dislocate my own hip 
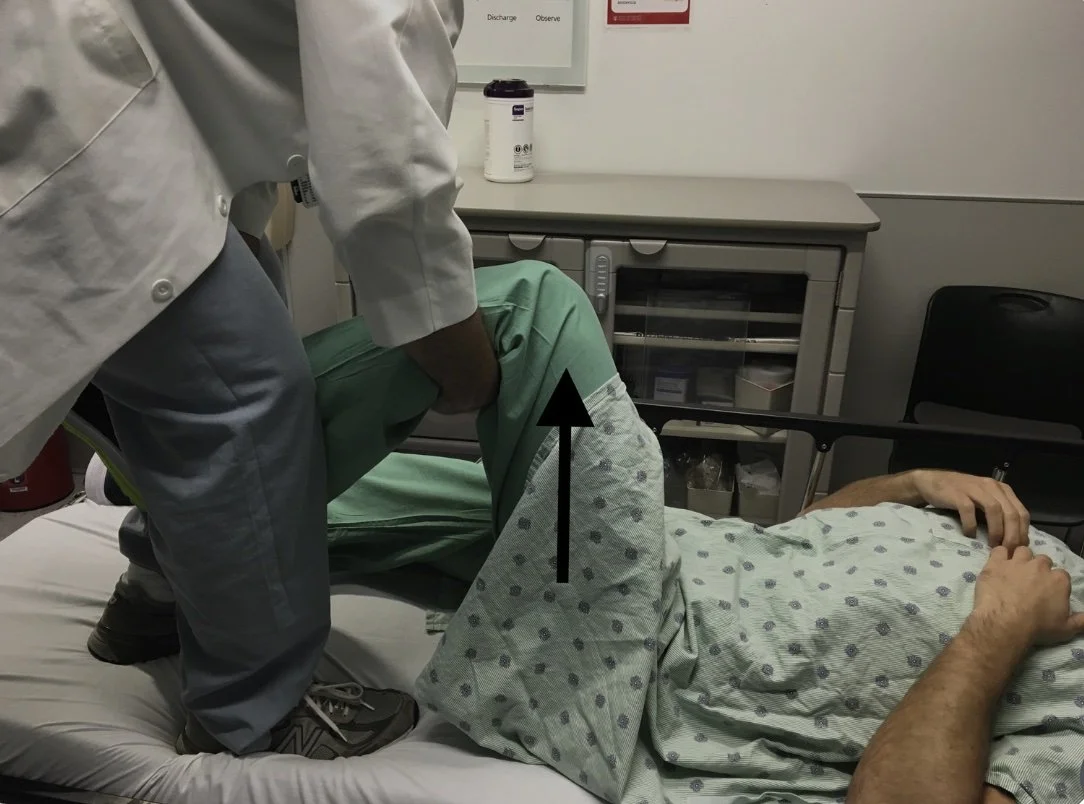
Allis 

Patient supine in stretcher 

You put your hands around ipsilateral tibia, standing on stretcher can get you better leverage 

Pull upwards, remember that consistent traction is key

Some personal takeaways 

  • Don’t forget you need a nurse to record vitals / draw meds during the procedural sedation and during that time you are utilizing a lot of resources. 

  • You need at least one assistant to help keep the pelvis in place while you are reducing for all these maneuvers shown above

  • Maximizing pain relief and relaxation will increase your chances of success, your patient should be loosey goosey. Consider a regional nerve block (femoral, fascia iliaca)

  • Dislocated hardware joints are extremely difficult to reduce, once I had three orthopedic residents yanking on a dislocated hip while the EM attending and I helped pull traction

  • You may wake up sore the next day 

References: 

  1. https://www.orthobullets.com/trauma/1035/hip-dislocation 

  2. https://coreem.net/core/hip-dislocation/ 

  3. https://www.merckmanuals.com/professional/injuries-poisoning/how-to-reduce-dislocations-and-subluxations/how-to-reduce-a-posterior-hip-dislocation#Equipment_v45399602

  4. https://www.annemergmed.com/article/S0196-0644(22)00050-6/fulltext 

 · 

POTD: Suture Choices

Hi everyone,

For today's POTD, I want to review the suture choices we have available when performing laceration repairs in the ED. Much of our training for laceration repairs is on-the-job, informal practice and learning, but I want to offer a more systematic approach. 

So, when you're getting all your equipment together for your laceration repair, what suture are you grabbing? And why? And whose "gut" are plain gut and chromic gut sutures coming from? We will go over questions to consider when making your choice, your suture options (with particular focus on what we have stocked at MMC), and some clinical examples for when you might choose each.

3 Questions to Consider When Choosing Your Suture

1) Tensile strength: How much tension is across the wound? A primary purpose of laceration repairs is to decrease tension across the wound. Remember everting edges? That's all in an attempt to give the wound a little extra skin to work with in case the tension does pull the edges apart as it heals. Whether to evert or not is controversial these days (definitely don't invert, though). But when it comes to sutures, the primary principle remains: choose the smallest size suture that can best fight the tension you're up against.

2) Site of laceration: Where on the body are you repairing? If it's going inside the body, aim for absorbable. If it's at the skin, you have more options.

3) Follow-up: What is the likelihood this patient can return for follow-up suture removal? For pediatric patients who have already gone through the trauma of getting stitches and whose parents have already had to somehow coordinate a single ED visit while a gaggle of other responsibilities awaits them at home, or patients with poor access to healthcare at baseline, consider sparing them a second ED visit for suture removal and trial absorbable sutures when possible.

Your Suture Options

Materials

There are two big buckets of suture materials: absorbable and non-absorbable. Within each of those buckets you have two main sub-types: braided/multifilament and monofilament. Braided essentially means that there are multiple strands woven together, and monofilament means a single strand. The more the strands means the tighter the knot... but also the more surface area for inflammation and infection. I've stuck to just remembering the brand names of the sutures, but you might come across the generic names; use whatever works for you. For the absorbable sutures, note that there is often a discrepancy between when the suture loses its strength and when the suture actually absorbs/falls off.

1) Absorbable: braided/multifilament, monofilament

a. Braided/multifilament: vicryl, vicryl rapide

i. Vicryl: buried, loses strength 21d

ii. Vicryl rapide: irradiated to speed up resorption, buried or used in skin, loses strength 10d

b. Monofilament: fast absorbing gut, plain gut, chromic gut

i. Fast absorbing gut: used in skin, great for face ("F"ast for "F"ace), loses strength 7d

ii. Plain gut: used in skin, loses strength 8-9d

iii. Chromic gut: coated in chromium to slow down resorption, used in skin, great for hands or oral lacs, loses strength 10-21d

**Fun fact: gut is short for "catgut" sutures. Cat lovers, don't be afraid; our suture materials aren't actually coming from cats' guts. But they are coming from cow, pig, and sometimes horse intestines, all of which are known to be highly collagenous, elastic, and strong.**

2) Non-absorbable: braided/multifilament, monofilament

a. Braided/multifilament: silk

i. Silk: used in skin, great for securing chest tubes/drains, must be removed

b. Monofilament: ethilon, prolene

i. Ethilon aka Nylon: used in skin, black in color, must be removed, OUR GO-TO SUTURE

ii. Prolene: used in skin, blue in color, great for black hair/beards, must be removed

Sizes

For thin sutures (which is most of what we stock in the ED), the smaller the number, the bigger the physical size. These range from 1-0 (pronounced "one-oh") to 12-0 (pronounced "twelve-oh). 1-0 is the biggest, and 12-0 is the smallest. We will mainly use size 2-0 to size 6-0.

For thick sutures, it is the opposite; the smaller the number, the smaller the physical size. These range from 0-10 (no "-oh" afterwards). 0 is the smallest, and 10 is the biggest. We have size 0 silk in the ED, but the other sizes are mostly for the surgeons.

Needle Types

Straight or curved is the main distinction to know. Straight you can use with your hands to secure drains/tubes. Otherwise we are using curved with our needle drivers. (Pro tip: I once saw Dr. Masoudi make a curved needle out of a straight needle by physically bending it with a needle driver himself and it was extremely cool).

Removal

The importance of removing sutures isn't just for appearance purposes; it's to decrease the risk of an inflammatory reaction to the foreign body currently embedded in the skin. So the quicker we can get them out, the better. When giving return instructions to our patients, take into account the size and location of the suture. A good rule of thumb is the average suture removal length is 7d, but that shortens to around 5d closer to the face and extends to around 10-14d further towards the extremities. Suture Man is always a helpful resource, too.

Examples for Suture Choices at MMC

Uncomplicated laceration in an adult patient? Non-absorbable monofilament, ethilon or prolene, size 6-0 for face and size 3-0/4-0/5-0 everywhere else

Face laceration in a pediatric patient? Absorbable monofilament, fast absorbing gut, size 5-0

Trunk/extremities laceration in a pediatric patient? Absorbable braided or monofilament, vicryl rapide or plain gut, size 4-0 or 5-0

Deep laceration >3cm that requires buried sutures? Absorbable braided, vicryl, size 4-0

Oral laceration? Absorbable monofilament, chromic gut, size 3-0 or 4-0

Laceration within or around hair? Non-absorbable monofilament, prolene, size 3-0 to 6-0

Figure 8 suture for brisk/arterial bleeding? Non-absorbable monofilament, ethilon, size 2-0 is our biggest

Chest tube securing? Non-absorbable braided, silk (straight needle), size 0

For practice, try to find each of these suture types below on our trauma metal shelving unit in resus room 51...

I highly recommend downloading the Suture app (https://www.suture.app/) on your phone to use on shift, which is an interactive tool that will tell you the appropriate suture material, size, and removal time depending on the location and tension of the wound. 

And, of course, we can't forget about skin glue (dermabond), steri strips, and the handy-dandy stapler. I am a die-hard fan of these quick, easy adjuncts for wounds that are low in tension and in an appropriate location for repair.

Happy suturing,

Kelsey

Resources:

1) https://canadiem.org/nice-threads-guide-suture-choice-ed/

2) https://www.ncbi.nlm.nih.gov/books/NBK539891/

3) https://www.emdocs.net/wounds-and-lacerations-in-the-ed-management-pearls-and-pitfalls-for-emergency-physicians/

4) https://coreem.net/core/suture-materials/

5) https://home.hippoed.com/blog/skin-deep-selecting-suture-material-for-the-skin-surface

6) https://www.aliem.com/pv-laceration-repair-and-sutures/

7) https://lacerationrepair.com/wound-blog/eversion/#:~:text=As%20it%20turns%20out%2C%20eversion,creating%20an%20optimal%20healing%20environment.

8) https://www.forbes.com/sites/quora/2018/09/26/what-is-catgut-really-made-from/


POTD: Eye'm Scared!

Does anyone else get freaked out by stuff involving the eye? Well, not after this POTD you won’t.

Today I’m going to cover eyelid lacerations, probably one of the trickier ones we can encounter in the ED. First off, you must rule out corneal injury and globe rupture. Once that has been done, you can move on to considering the repair.

Repairing eyelid lacs are within the realm of the ED physician, but only under certain conditions. If any of the following findings are present, then you should involve an ophthalmologist for definitive repair.

·      Involvement of the lid margin >1mm

·      Within 6-8mm of the medial canthus (suggesting lacrimal duct/sac involvement) – can lead to poor drainage, excessive tearing and recurrent conjunctivitis or stye!

·      Through and through lacerations (involves the tarsal plate)

·      Ptosis (suggesting levator palpebrae muscle involvement)

To repair, considering using a supraorbital block or infraorbital block depending on location. Topical LET or EMLA may be considered if applied carefully to prevent leakage into eye. Then use very fine material such as 6-0 or even 7-0 sutures. These should be removed in 5-7 days and pt should follow up with an ophthalmologist ideally.

Some cool tricks tricks of the trade:

1)  To check for lacrimal duct involvement: can instill fluorescein carefully over cornea only and place a wood’s lamp over laceration. If fluorescence in wound, that means you have lacrimal duct involvement

2)  Use Tegaderm and cut a window into it using fine scissors to approximate the size/shape of wound you want to repair. Place over area of interest and can use tissue adhesive to glue together laceration; any glue run-off will get on Tegaderm instead!

3)  Use tetracaine and then place a Morgan Lens under the lids to act as an eye shield to prevent iatrogenic globe rupture while suturing.

References

https://lacerationrepair.com/techniques/anatomic-regions/lacerations-around-the-eye/

https://wikem.org/wiki/Eyelid_laceration

 ·