Topical Tetracaine: To Take Home or Not?

Hi everyone,
For today's POTD, we will be looking at the question of whether tetracaine and other topical anesthetics are safe to give patients to take home for corneal abrasions.
Conventional teaching is that while effective at reducing pain, prolonged use of topical anesthetics leads to poor wound healing of the corneal epithelium, and potential development of badness such as corneal ulcers down the line.
Where does that dogma actually come from, and does that really mean your patient's eyeball is going to melt off immediately if you slip them a bottle of tetracaine to take home?
Let's look at some cold, hard facts, courtesy of Rebel EM:

As you can see, these were all small case reports or case series. More importantly, in all but one case, the patients with adverse outcomes were abusing topical anesthetics for weeks/monthsat higher concentrations than those typically used today.

In recent years, there have been a slew of newer studies from both emergency and ophthalmology literature attempting to refute this dogma. A systematic review of these studies was published in 2015 by Swaminathan et al. in JEM, titled "The Safety of Topical Anesthetics in the Treatment of Corneal Abrasions: A Review."

- This included 2 ED-based, randomizeddouble blindplacebo-controlled studies on human patients with corneal abrasions.

- There were also 4 studies on patients who underwent photorefractive keratectomy (PRK), an ophthalmologic procedure similar to LASIK where a corneal incision is made, kind of like a corneal abrasion.

All 6 studies demonstrated that a short course of dilute topical anesthetic provided efficacious analgesia without adverse effects or delayed epithelial healing.

A separate observational chart review in Annals from 2017 by Waldman, et al. looked at 1576 corneal abrasions, 533 of which were simple, who were treated with topical tetracaine 1% for 24 hours.
Simple was defined as: not large, penetrating, or lacerating, with onset within 2 days from a simple traumatic cause, excluding chemical exposure, contact lens use, infection, retained foreign body, or other contamination.
- 57% of the simple corneal abrasions were given tetracaine, and 14% of non-simple corneal abrasions also received tetracaine.
- While there were ZERO serious complications for ANY patient given 24 hr of tetracaine, the authors did find a slight increase in the number of repeat ED visits in non-simple corneal abrasion pts who were given tetracaine.
Bottom line: 
1) Short-term use of dilute topical anesthetics for simple corneal abrasions for 24-48 hrs is definitely effective and most likely safe, as shown by several recent small but well-designed randomized controlled studies.
2) The risk and safety concerns associated with the use of topical anesthetics is likely overstated, and come from poorer quality evidence such as experimental animal studies, case reports, and case series.
3) At the same time, larger studies should be undertaken to assess safety before the widespread use of this pain management modality can be recommended.
References:
 · 
Share

Trauma Tuesday: Burr Holes!

Hi everyone, This Trauma Tuesday, we'll be discussing the ED approach to Burr holes, inspired by a discussion from today's Trauma Sim. This is admittedly a procedure that few if any of us have ever or will ever need to do. But just in case you ever find yourself manning a rural ED with the nearest neurosurgery center hours away, let's refresh our minds.

There was a great article in last month's ACEP Now newsletter (http://www.acepnow.com/article/perform-emergency-burr-hole-procedure/) written by the medical director of a rural 12-bed ED who recently saved a young boy's life by performing a Burr hole:

2 year old child presented after falling out of shopping cart. Initially appeared well and running around the exam room. However, he became somnolent after a period of observation and had slightly unequal pupils on repeat exam. Head CT showed a large epidural hematoma with midline shift. His pupillary exam drastically worsened (6 mm and 2 mm) and he was intubated. The nearest pediatric trauma center was 1 hour away by helicopter. The patient would almost surely herniate en route if no intervention was done. The physician made the decision to perform a Burr hole, evacuated 150 mL of blood, pupils improved, pt was shipped out, and returned to the ED 1 month later for an unrelated visit, running around and completely neuro intact. PRETTY AWESOME, RIGHT?

First let's review the indications for an ED burr hole. They're pretty simple:

  • Epidural/subdural hematoma with midline shift on imaging and unequal pupils on exam
  • GCS<8
  • Anticipated extended time to neurosurgical intervention. Small studies show that ED Burr holes are most effective when performed within 60-90 min of onset of anisocoria. (Door-to-drill time metric?? Think of those patients who arrive walky/talky and decompensate in front of your eyes. Sort of reminiscent of indications for an ED thoracotomy)

Next, let's review the anatomy. This diagram shows 3 potential locations for Burr holes to be done, depending on the location of the bleed on CT. I've seen Neurosurgery in our ED use the parietal site to place an external ventricular drain. The safest location for the ED physician is to go for the temporal site, due to lowest risk of further puncturing the middle meningeal artery. The temporal site is found by going 2 cm anterior and then 2 cm superior to the tragus (pictured).

Now let's review the procedure itself.

STEP 1: Get your equipment - manual trephinator (commercially made kits are available; the Galt trephine shown below is typical), sterile drapes/gown/gloves, chlorhexidine preps, razor (must shave the scalp at the site), scalpel, local anesthetic.

STEP 2: Adjust the stopper on the trephinator to the appropriate depth based on the CT, as shown here:

STEP 3: Once the site is shaved and prepped, inject local anesthetic. Start with a vertical incision with the scalpel down to the periosteum to expose it.

STEP 4: Apply the trephine with gentle, steady pressure until the skull is penetrated. Remove the bone fragment and store in sterile saline. The clot may not immediately extrude; if so then use a pediatric suction catheter to GENTLY facilitate hematoma drainage. Once blood flow slows/stops, apply a loose sterile dressing. Do not tamponade the bleeding.

And of course, final step is to transfer the patient out immediately. Who's ready to do some Burr holes? :)


References: https://wikem.org/wiki/Burr_hole http://resus.me/burr-holes-by-emergency-physicians/


 · 
Share

Jaw Dislocations

Today we're talking TMJ dislocations. Ever seen one of these? They're kind of cool to reduce. We'll be discussing several ways to reduce these, starting with the classic way, and followed by 2 creative approaches. How do these occur? After extreme opening of the mouth - ex: yawning, dental work, biting into a very large sandwich (not kidding).

Diagnosis is clinical! These are typically anterior dislocations, meaning the mandibular condyle is displaced anteriorly from its articular groove in the temporal bone. Pictures below.

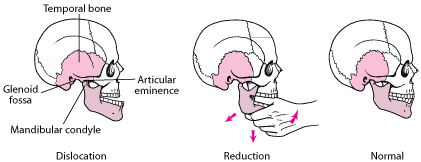
Now let's talk reduction!

First, the classic intra-oral approach: this involves the physician placing his/her thumbs into the patient's mouth along the lower molars, and applying posterior and inferior force to guide the mandible back into its groove, like so:

Downsides: - Often requires procedural sedation - Requires a surprisingly large amount of force - You have to put your hands into the patient's mouth, which is risky

Luckily, there is not one, but two better ways! The extra-oral reduction technique, and the hands-free "syringe technique." Intrigued?

Extra-oral technique: When the mandible is dislocated, the coronoid process is palpable externally over the cheek. By applying steady posterior pressure over the coronoid, the mandible can be easily reduced. You'll know it's in when the coronoid process is no longer palpable.

Use your other hand to provide support and gentle counter-traction (figure 4).

This video shows it's really as easy as it sounds: https://youtu.be/N3edJvp5DoA

And if that doesn't work, try the hands-free syringe method (diagram below):

- Place a 5 or 10 mL syringe between the patient's molars on the dislocated side. - Instruct the patient to bite down and roll the syringe back and forth between the teeth until reduction is achieved. - This method utilizes the patient's own jaw musculature to create the posterior/inferior forces for jaw relocation.


A nice 2 min video overview where the syringe technique is demonstrated: https://coreem.net/procedures/tmj-reduction/

That's all for today. Happy New Year's, everyone!

References: https://www.aliem.com/2016/01/trick-of-the-trade-extra-oral-technique-for-reduction-of-anterior-mandible-dislocation/ https://coreem.net/journal-reviews/syringe-technique/


 · 
Share